树莓派SPI驱动OLED屏幕

目录

  1. 1. 连接引脚
  2. 2. 安装依赖
  3. 3. 编写脚本
  4. 4. 开机启动

曾经在B站看到过有人用树莓派连接OLED屏幕播放Bad Apple(有屏幕的地方就有Bad Apple),想到前些年在智能车打酱油时遗留下的一块128*64的OLED屏幕,就想给树莓派加一个monitor。

连接引脚

物理编号

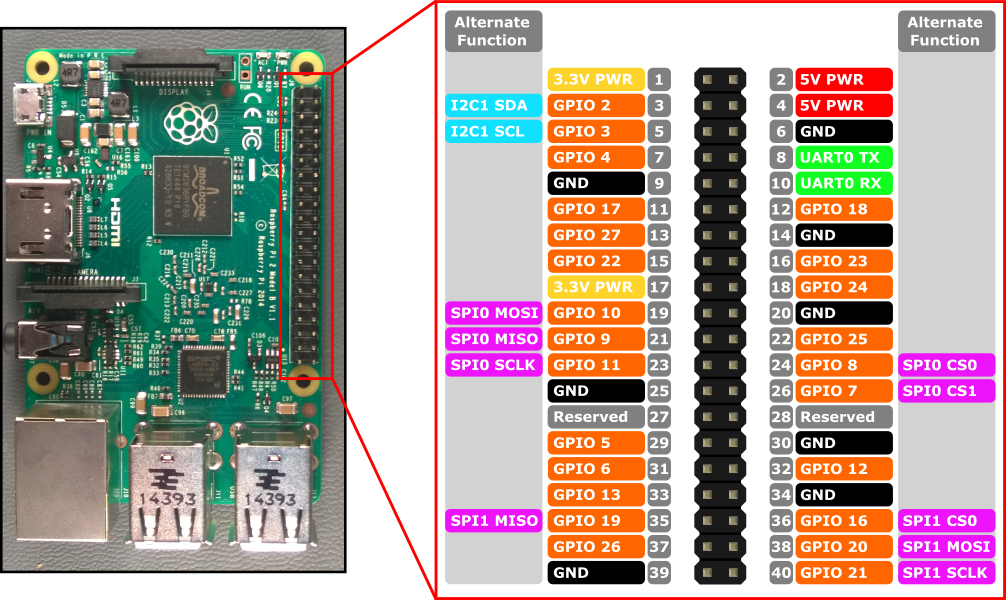
屏幕上有7个引脚,与树莓派用母对母杜邦线连接,接法如下表:

OLED引脚 功能 树莓派引脚 编号
GND GND 25
VCC 3.3V PWR 17
D0 SCLK GPIO 11 23
D1 MOSI GPIO 10 19
RST GPIO 17 11
DC GPIO 27 13
CS CS0 GPIO 8 24

安装依赖

在驱动屏幕之前要先启用SPI:

sudo raspi-config

然后选择Advanced Options里的SPI并启用它,然后执行sudo reboot重启。重启后执行ls /dev | grep spi,如果显示:

spidev0.0
spidev0.1

就说明设置生效了。

先安装一些要用到的Python模块:

sudo apt-get install build-essential python-dev python-pip
sudo apt-get install python-imaging python-smbus
sudo pip install RPi.GPIO

然后克隆SPI的驱动模块并安装:

git clone https://github.com/adafruit/Adafruit_Python_SSD1306.git
cd Adafruit_Python_SSD1306
sudo python setup.py install

编写脚本

网上有人给出了Python版的测试Demo:

1
2
3
4
5
6
7
8
9
10
11
12
13
14
15
16
17
18
19
20
21
22
23
24
25
26
27
28
29
30
31
32
33
34
35
36
37
38
39
40
41
42
43
44
45
46
47
48
49
50
51
52
53
54
55
56
57
58
59
60
#!/usr/bin/python/
# coding: utf-8
import time
import Adafruit_GPIO.SPI as SPI
import Adafruit_SSD1306
import Image
import ImageDraw
import ImageFont

# Raspberry Pi pin configuration:
RST = 17
# Note the following are only used with SPI:
DC = 27
SPI_PORT = 0
SPI_DEVICE = 0

# 128x64 display with hardware SPI:
disp = Adafruit_SSD1306.SSD1306_128_64(rst=RST, dc=DC, spi=SPI.SpiDev(SPI_PORT, SPI_DEVICE, max_speed_hz=8000000))

# Initialize library.
disp.begin()

# Clear display.
disp.clear()
disp.display()

# Create blank image for drawing.
# Make sure to create image with mode '1' for 1-bit color.
width = disp.width
height = disp.height
image = Image.new('1', (width, height))

# Get drawing object to draw on image.
draw = ImageDraw.Draw(image)

# Draw a black filled box to clear the image.
draw.rectangle((0,0,width,height), outline=0, fill=0)

# Draw some shapes.
# First define some constants to allow easy resizing of shapes.
padding = 1
top = padding
x = padding
# Load default font.
font = ImageFont.load_default()

# Alternatively load a TTF font.
# Some other nice fonts to try: http://www.dafont.com/bitmap.php
#font = ImageFont.truetype('Minecraftia.ttf', 8)

draw.text((x, top), 'This is first line', font=font, fill=255)
draw.text((x, top+10), 'This is second line', font=font, fill=255)
draw.text((x, top+20), 'This is third line', font=font, fill=255)
draw.text((x, top+30), 'This is fourth line', font=font, fill=255)
draw.text((x, top+40), 'This is fifth line', font=font, fill=255)
draw.text((x, top+50), 'This is last line', font=font, fill=255)

# Display image.
disp.image(image)
disp.display()

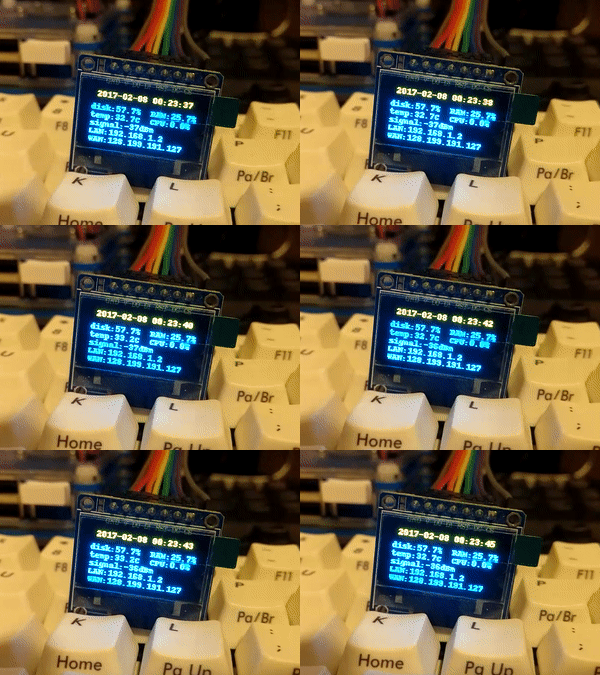
如果运行它能正常显示就可以编写自己的脚本了。参考这个Demo我又撸了一个显示系统实时信息的脚本:

1
2
3
4
5
6
7
8
9
10
11
12
13
14
15
16
17
18
19
20
21
22
23
24
25
26
27
28
29
30
31
32
33
34
35
36
37
38
39
40
41
42
43
44
45
46
47
48
49
50
51
52
53
54
55
56
57
58
59
60
61
62
63
64
65
66
67
68
69
70
71
72
73
74
75
76
77
78
79
80
81
82
83
84
85
86
87
88
89
90
91
92
93
94
95
96
97
98
99
#!/usr/bin/python/
# coding: utf-8
import os
import time
import socket
import fcntl
import struct
import requests
import Adafruit_GPIO.SPI as SPI
import Adafruit_SSD1306
import Image
import ImageDraw
import ImageFont

def raminfo():
with open('/proc/meminfo') as f:
total = float(f.readline().split()[1])
free = float(f.readline().split()[1])
return format((total-free)/total, '.1%')

def diskinfo():
st = os.statvfs('/')
total = float(st.f_blocks * st.f_frsize)
used = float(st.f_blocks - st.f_bfree) * st.f_frsize
return format(used/total, '.1%')

def cpuinfo():
with open('/proc/stat') as f:
info = f.readline().split()
t0 = float(info[1]) + float(info[2]) + float(info[3])
s0 = t0 + float(info[4]) + float(info[5]) + float(info[6]) + float(info[7])
time.sleep(0.033)
with open('/proc/stat') as f:
info = f.readline().split()
t1 = float(info[1]) + float(info[2]) + float(info[3])
s1 = t1 + float(info[4]) + float(info[5]) + float(info[6]) + float(info[7])
return format((t1-t0)/(s1-s0), '.1%')

def cputemp():
with open('/sys/class/thermal/thermal_zone0/temp') as f:
temp = float(f.readline())
return format(temp/1000, '.1f')

def wifiinfo():
with open('/proc/net/wireless') as f:
f.readline()
f.readline()
info = f.readline().split()
return info[3][:-1]

def get_ip_address(ifname):
s = socket.socket(socket.AF_INET, socket.SOCK_DGRAM)
return socket.inet_ntoa(fcntl.ioctl(
s.fileno(),
0x8915, # SIOCGIFADDR
struct.pack('256s', ifname[:15])
)[20:24])

IP = requests.get('http://ip.3322.net').text

# Raspberry Pi pin configuration:
RST = 17
DC = 27
SPI_PORT = 0
SPI_DEVICE = 0

# 128x64 display with hardware SPI:
disp = Adafruit_SSD1306.SSD1306_128_64(rst=RST, dc=DC, spi=SPI.SpiDev(SPI_PORT, SPI_DEVICE, max_speed_hz=8000000))
# Initialize library.
disp.begin()
# Clear display.
disp.clear()

while True:
disp.display()
# Create blank image for drawing.
width = disp.width
height = disp.height
image = Image.new('1', (width, height))
# Get drawing object to draw on image.
draw = ImageDraw.Draw(image)
# Initialize background.
draw.rectangle((0,0,width,height), outline=0, fill=0)

padding = 1
top = padding
x = padding
font = ImageFont.load_default()

draw.text((x, top), time.strftime(" %Y-%m-%d %H:%M:%S ",time.localtime(time.time())), font=font, fill=255)
draw.text((x, top+14), 'disk:' + diskinfo() + ' RAM:' + raminfo(), font=font, fill=255)
draw.text((x, top+24), 'temp:' + cputemp() + 'C CPU:' + cpuinfo(), font=font, fill=255)
draw.text((x, top+34), 'signal:' + wifiinfo() + 'dBm', font=font, fill=255)
draw.text((x, top+44), 'LAN:' + get_ip_address('wlan0'), font=font, fill=255)
draw.text((x, top+54), 'WAN:' + IP, font=font, fill=255)

# Display image.
disp.image(image)
disp.display()

效果如下:

开机启动

先新建一个Unit配置文件:

sudo vim /etc/systemd/system/oled.service

内容如下:

1
2
3
4
5
6
7
8
9
10
[Unit]
Description=oled autostart

[Service]
Type=idle
ExecStart=/usr/bin/python /home/pi/oled.py
Restart=always

[Install]
WantedBy=multi-user.target

然后启动并加入启动项:

sudo systemctl daemon-reload
sudo systemctl start oled
sudo systemctl enable oled